FilmCraft Keyframe Animation: Make a Still Image Move in Three Steps
Set an initial value, create a second keyframe, and refine interpolation for a controlled push-in or title movement.
Filmcraft · Updated
Loading guide…
A keyframe records a parameter value at a particular point in time. Two keyframes let FilmCraft calculate the values between them. That is enough for a still-image push-in, a simple title move, or a gradual opacity change. Start with one parameter so you can understand why the movement behaves as it does.
This walkthrough uses a selected timeline clip and its Motion controls. FilmCraft also supports animation on graphic layers; those controls can affect a different part of the composition. Confirm whether you are moving the whole clip or a layer inside a graphic before adding animation.
1. Set the initial state
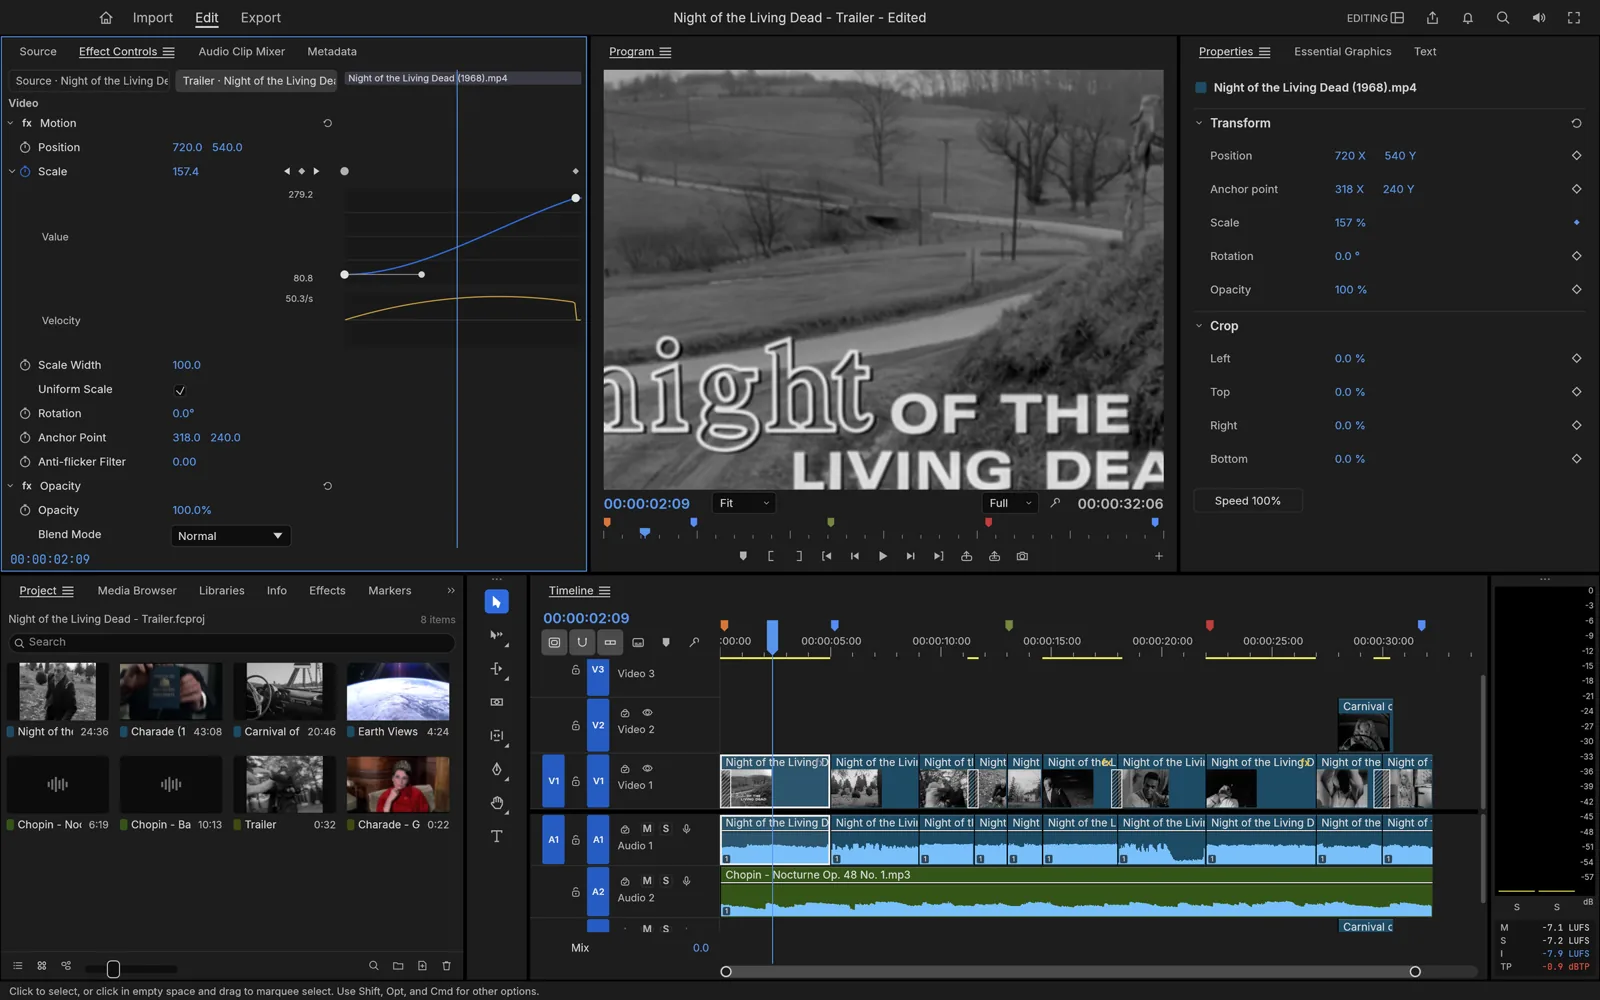
Place a still image or video clip on a practice sequence and save the project. Select that clip on the timeline, position the playhead where the animation should begin, and open its Effect Controls. Expand Motion and locate the parameter you want to animate, such as Scale or Position.
Set the starting composition before enabling animation. For a push-in, make sure the image covers the frame and the subject has enough room for the later crop. Turn on the parameter's stopwatch and confirm that the initial keyframe appears at the intended position. Inspect the keyframe lane rather than assuming the click created a keyframe where you expected.
Keep the playhead within the selected clip's visible duration. If two clips overlap on different tracks, the Program monitor may show the upper clip even though you selected the lower one. Temporarily inspect the relevant track or selection before concluding that the parameter is broken.
Use the parameter's keyframe lane and navigator to confirm where values are
stored.
Move in time and create the ending state
Move the playhead to the intended end of the motion. Change the animated parameter to the finishing value. In an animated parameter, changing the value at a new position creates or updates a keyframe. Confirm that there are distinct start and end keyframes rather than repeatedly editing the same one.
For a push-in, increase Scale while checking the subject's crop. Add Position animation only if the subject needs to remain in a particular area as the image enlarges. If both parameters move, give them deliberate start and end points; unrelated keyframe times can create an accidental curved or uneven-looking move.
Use the previous/next keyframe navigator to inspect each stored value. FilmCraft's Effect Controls and Properties panel share a navigator with arrows and a diamond control. The diamond adds or removes a keyframe at the playhead, so check its state before clicking it repeatedly.
Play across the movement from before the first keyframe to after the last. Scrubbing directly between the two endpoints can hide a jump immediately outside the animated section. If the image goes outside the frame, correct the values or shorten the movement rather than hiding the problem with an unrelated effect.
Refine interpolation and verify the result
Begin with linear interpolation when you want to see the relationship between values clearly. Use ease or Bezier controls when the motion should accelerate or settle more gently. A Hold keyframe creates a discrete change instead of a continuous transition, so it is unsuitable for a smooth push-in unless that jump is intentional.
FilmCraft documents value and velocity graphs for animated parameters. Inspect these after applying easing: the endpoints can be correct while the movement between them overshoots or accelerates unexpectedly. Make one change at a time and replay the complete move.
If animation disappears after trimming, check the keyframe times against the remaining clip range. Graphic-layer timing and clip-effect timing can behave differently when a graphic is trimmed. Also avoid turning off a stopwatch merely to pause playback: disabling animation can remove its keyframes. Use playback controls to stop, and Undo if you accidentally remove animation.
Finish by exporting a sample with your intended dimensions. Check edges, title readability, and movement at normal speed. For a portrait version, use the vertical video guide and adjust framing deliberately rather than copying the landscape crop unchanged.